Monday, July 30, 2012

Creating a Custom Sign


Im excited about posting this because I cant believe how easy this was, I know crafty people say that crap all the time but really these are my first few attempts at being crafty so Im sure anyone could do it.  And for me it was F-R-E-E,  FREE because I happened to have everything to make this.  The first post relating to this was a burlap picture my cousin wanted that I kinda copied and made for her.  It was harder to make and in my opinion didn't turn out as good.  This "HOME" sign Im posting about now was the second item she had whispered in my ear about copying.  Now mind you I don't feel bad about copying these "ideas" because they were overpriced and mine don't look like "theirs"...that much.  Ok so on with it because I LOVE this idea and I see me making a lot more of these in the future.  And I hope someone else reads this that's not crafty and does it, because I did it, and I'm not crafty.
FIRST A TIP:  (I love giving tips, like, since I did it once I'm an expert) If you don't want to buy wood for projects like these you seldom should EVER have too do so.  Almost any construction site in any neighborhood will lend you a piece of left over wood.  Most of it is thrown away in a dumpster anyways. (Don't get me started on that but if you wanna learn something awesome look up http://www.phoenixcommotion.com/)   You probably pass two or three on your way to work and just never considered stopping and asking for a piece of wood for a craft project your doing.  I mean if your half way decent looking and you pull up and tell them you are a local artist or that you live in the neighborhood and you need and scrap piece of wood ummm.... lets just say usually they will be so happy to give you one they might fall off the roof trying to get it to you.  So don't pay for wood for this project.  Be bold and go ask for it.
OK
WHAT YOU NEED:
WOOD - either a flat piece or do like I did and glue a bunch of little pieces together.  I had some nice small oak pieces that were left overs in my burn pile that I fished out.  I didn't even clean them off and I kinda liked the pieced together look. But it took longer and requires wood glue so that's up to you but I used what I had.  ABOUT THE SIZE:  I just eyeballed it.  You will be using one piece of standared printer paper per letter for the word so that's a good judge to go by.  You can kinda lay four pieces of paper out or if you have an area you know where you want the sign to hang measure it and fit it to that and just move your letters closer or farther apart.
WOOD GLUE
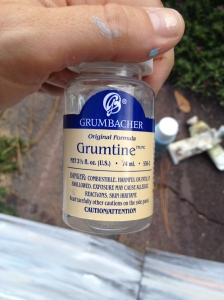
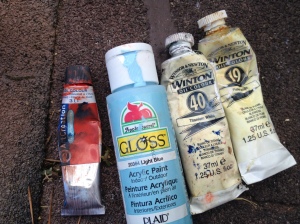
PAINT:  I used oil paint mixed with the thinner shown and put in little streaks of blue that were acrylic.  I did this because its what I had at my house already.  I did read that the letters transfer better on chalky paint but I'm an improviser and made do.  I would think if your buying paint for this go with acrylic its easy and dries to a good finish for the letter transfer.
PRINTER
PAPER
SHARPIE MARKER (or anything you want, you'r only using the round end of this to burnish the letters on your board)
PAINT BRUSH or SPONGE
GET YOUR BOARD READY: glue all your little pieces together and let it sit overnight or the hot Texas sun for about four hours.  Secure your pieces to another flat board to make sure they all hold together.  See picture.  This also gives you a good place to hang hooks in the back for mounting.
PAINT:  Lightly wash the colors onto the board and blend together.  This takes you just playing around a little but its easy and cant be messed up so its the fun part! Be creative, I used white, a little burnt orange and powder blue, but mainly white.  Let dry overnight or four hours in the Texas sun  :)
PRINT OUT LETTERS BACKWARDS: or in mirror.  This was the toughest part of the whole project, figuring out how to get Word 2007 to do Mirror print.  Here is a tutorial I finally had to use.  Word 2007 tutorial on Mirror Print
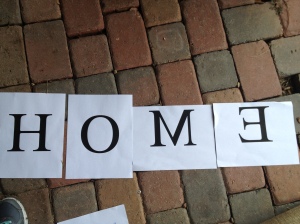
DUH.  Print "HOME"  I used the font Dutch blown up to 500. printing one word per page. The M and the E will be backwards.
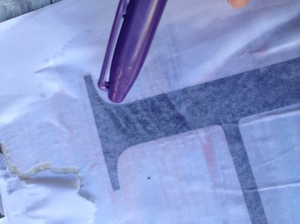
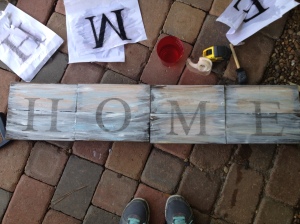
LAYOUT LETTERS AND BURNISH:  lay out your letters with the print side facing down (the M and E will be backwards) and use a light piece of tape to keep them in place.  You may need to remove this tape so don't stick it down to hard.  You also may want to measure out your letters so they are all the same distance from the bottom of the wood.  Take a sponge or brush and go over the first letter with water lightly.  This is a careful balance: not too much water and not too little.  Now take the end of your sharpie WITH THE LID ON, use the round part and start rubbing (burnishing) the ink on the letter "H"  Its kinda like your just lightly scribbling over the back.   Not too hard or your will go through the paper not too soft or you wont transfer the ink enough.  Its easy to tell the pressure you need.  Don't be tempted to peek before done or your might get a crooked letter.  Do the whole letter till it looks like the paper is almost rubbed through then slowly pull it up and off.  Move to the "O" and repeat.
That's it! Easy as pie and amazingly pretty.  If your letters seem too light go over them after they have dried with a thin coat of watered down black paint.  Or if your like me, I was too much of a weenie to do that, and was scared to mess it up and used a regular old pencil and a little charcoal pencil around the edges.
Hang and admire!
Saturday, July 28, 2012

Packing panties

Always pack an extra pair of panties, and always be prepared to put your big girl panties on - you'll never regret either.

Thursday, July 26, 2012

Note to Self:

Pray more,
don't judge anyone
The bible says so!
Its hard
If it was easy everyone would do it.

Workout Partners

So im a scatterbrained dingbat and my boyfriends an organizational manager. Not really but thats what i call him. After yesterday I realized I should be adding my exercise and workout stuff to this page too. The point of the first sentence is this: if your like me and naturally lazy find yourself an exercise partner that's highly motivated. I know people who post ads at the local gym for exercise partners and even in classifieds. Ok get an accountability partner that's highly motivated and knows what they are doing, kinda a leader. Then buy caffeine pills set them bedside your bed and set your alarm for 30 min before you want to get up. When your alarm goes off take the pills and you'll pop right out of bed! Magic.
Today: interval sprints for 45 min and kicking soccer ball back and forth. It sucks and it's hard. Skinny knees here I come

Wednesday, July 25, 2012

The mind is the builder - quick tip - READ!

Problem areas: knee fat (weird i know) inner thighs (of course) and i seem to have inherited underarm fat - another weird one.  To explain, its like my boob just keeps on going right around to my back. ewwww yuck i know awful visual. These are areas of my body i have hated for a long time.  I have been working out since january and have seen some good results but not much in these areas.  I said to my boyfriend today that i CAN tell my body is getting stronger and every now and then i catch a glimpse in the mirror and i can tell i just don't jiggle as much walking by it.  I have lost about 10 lbs so nothing life changing but i still have the knee fat, thighs and underarm fat that drive me crazy.  Today i was complaining about these things and gripping out-loud about how i dont know if they will ever disappear and my boyfriend did an amazing thing.  He came up behind me and put his hands over my eyes and said close your eyes and picture each one of those areas.  Ok yuck, done.  At this point im almost going to get pissed off but i hear him out.  Then he said something life changing.  Now picture them how you want them to look.  Wow i tried and couldn't, all my mind would let me see was how they ARE.  i have a good imagination so i set there with his hands still over my eyes and made myself see those three areas of my body with muscles instead of fat. Why was this so hard? Why had i never done it before? i knew my goal, i have seen thousands of pictures of other peoples skinny armpits i wanted but had never pictured my own skinny armpits.  Nick said the first part of accomplishing something is being able to see yourself doing it or being it.  BONG! I know this, i do this and we live by this idea that the mind is the builder so it blew my little mind that i had never incorporated it into THIS area of my life.  I challenge you to do it, try it.  Ill be picturing my skinny knees every time i run from now on. 

NOTE:  If your interested in more about what i mean when i say the mind is the builder Edgar Casey was an amazing source on it and i encourage reading about it.

Tuesday, July 24, 2012

Burlap Art


Ok so this little project all started off with a visit from my cousins. Please allow me an introduction: Brianne – (one of my cousins from the visit) just moved into a new home that my grandfather has completely built for her by himself from the foundation up over the last few years. I know, WOW Right. (I had to brag on him a little!!) So, now that all the work is done and she has FINALLY moved in she gets to have a little fun and start decorating.  Of course she is on a very tight budget so everything she loves usually gets put off until another day.  Well there were two such things she saw she wanted on our trip to Galveston.  She pulled me hard by the sleeve and said “come here” in a hushed voice.  I obeyed and she led me over to the corner of one of the shops we were browsing in.  She said (in the same hushed voice) “do you think you could do that for me?” and pointed to a cute overstuffed corner of home goods. I stared at all the little things and said “What?” in my regular voice.  I was pretty sure no one was around or even cared at what scheme she had planned to whisper in secrecy to me. First she pointed out a white painted sign on old driftwood that had HOME across the front in dark blue letters.  Very cute – $150.00 dollars – NO WAY! Next she pointed to a burlap picture a little small things mounted with brads with a flure de leise in the middle.  $55.00 – cute but still… NO WAY. So I inspected the items and gave a solid “Yes, I can do that”. I’m so glad that they have faith in my abilities because I would never have picked these projects on my own.
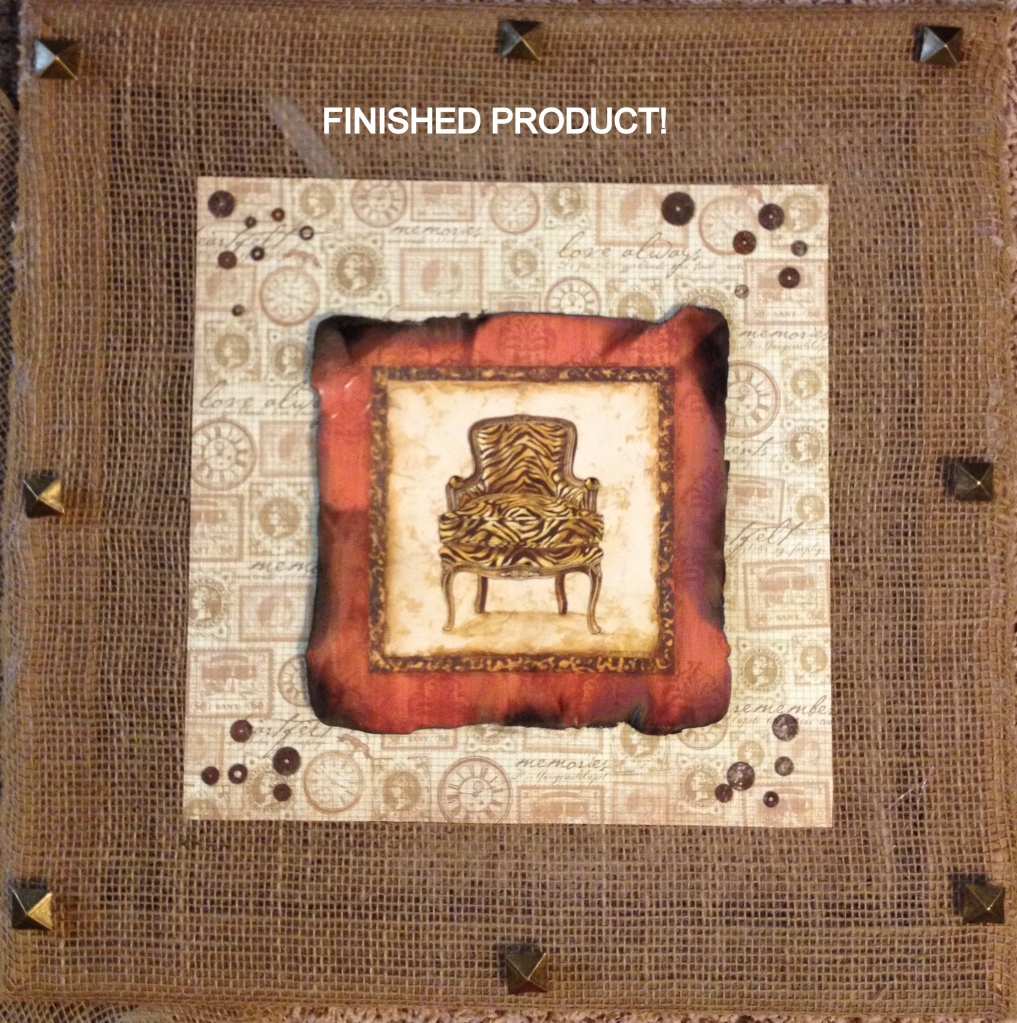
The first is the burlap picture and here are the instructions on how to make your own for cheap.  Something also very awesome about this is if you need to know how to build a picture frame just use the first step shown here.  If you want to do it faster then you don’t have to build your own frame just use an old one.
WHAT YOU NEED:
a piece of scrap wood, wood glue, mounting glue, hot glue gun, a 45 degree cutter box, burlap, fabric pins, scrapbook paper, and a picture for the middle -
A note about the picture for the middle: I used a $5.00 Dollar Store picture I found and took it out of the frame and burned the edges to make it look old, you could use a photograph or anything!
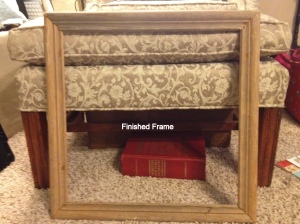
PART ONE: TO BUILD THE FRAME:
Step 1. MEASURE: Take a long scrap piece of wood and measure it out in 45 degree angles. Let me explain what I did. I used the saw box to score the wood on one end and then measure and scored it on the next end. You need four pieces so I did it four times down the board, for visual people like me this is what the cuts look like.
\__________/\___________/\___________/\__________/
cut them like that and they will magically come together in a square.
Step 2: CUT: So to save time I scored the wood with the saw box drew lines all down the wood with a pencil just like the picture above and then cut them all out at one time with Skill saw.
Step 3: Glue these little babies will all just fit together and make a frame. Glue them and set them to dry.
Part one is done!
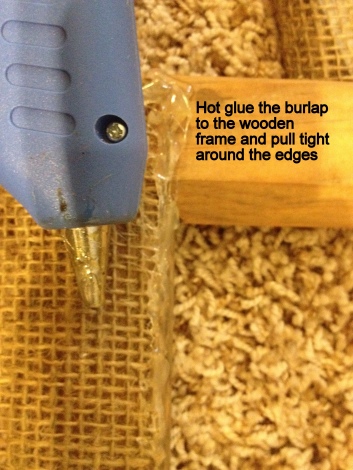
PART TWO: HOT GLUE THE BURLAP TO THE FRAME
Step 1: PLUG the glue gun in!
Step 2: GLUE the top row of butlap to the back of the frame so its hidden.
just keep pulling it tight and gluing it.
Part Two is done
PART THREE: MOUNT THE PRETTY STUFF
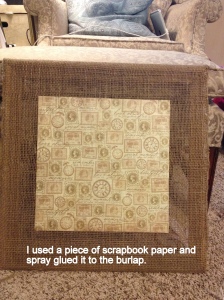
Step 1: Use your spray glue adhesive and tack on a piece of scrapbook paper to the middle. Let dry. Try to center it nice and pretty.
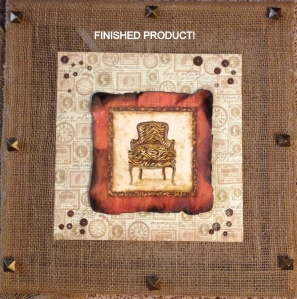
Step 2: Take your picture for the center and mount it to the center of the scrapbook paper. I had to use a little spray adhesive and some hot glue for the edges. I also burned mine around the edges to make it look a little less “DOLLAR STORE”. I did it over a pan of water and was very careful not to burn my house down.
Step 3: Add some details. I added the fabric nails to the edge of the wooden frame to make it look like they were holding the burlap on. I also added a few old watch pieces I had in an old box to the corners of the scrap paper for a little extra something special.

THAT’S IT!

Friday, July 20, 2012

Quote of the night:

Quote of the night: When your plate is full of napkins and you dig back in for one more fry.

Tuesday, July 17, 2012

Sunshine on your ego

Sometimes your humming along in life and everything is great and the birds are singing
and the sunshine on your nose,
and then BAM! 
There you are on the sunny sidewalk sprawled out with your business showing to the world.
With the plain, flat reality,
Clear as the sky that just a few minutes ago your head was rolling around in. 
If your noes is stuck that high in the air then you cant see where your headed girl, 
but history revels it to me like a best friend whispering in my ear. 
"sidewalk sprawled"
You'll trip over a big pile of your own ego 
and end up right in a hot pile of your own mess.
Remember Goliath fell from a pebble a boy picked up
and your no Goliath miss.

Saturday, July 14, 2012

Quote of the night:

Wherever there is a church there is always another little place that isn't a church. - a friend

Friday, July 13, 2012

Good workout tip

Hey all my scatterbrain friends, running out the door, at the last minute, for everything, here is today's advice. When your in a big hurry and trying to get to the gym and squeeze in a workout because you have procrastinated it for the last ten years, take time after you throw your sports bra over your head to straighten up your nipples. Oh yes it happens! It's awful to say but if your unaccustomed to workout clothes or working out trust me this is a golden tip that no one else will tell you. And yes I know because it happened and I looked in the mirror in the girls locker room after a full work out and realize one nipple is pointed straight up toward the ceiling and the other is off to the side looking down in shame. God I hope this helps someone because then maybe the embarrassment might be worth it. Lesson learned. Adjust before sprinting out the door in a sports bra. Fitness tip of the year!
....ummmm no picture with this one friends :)

Thursday, July 12, 2012

A Series of Interviews: #1 Acadian Joie de Vivre

This is a story I just found out about. It is about my great grandmother. This is my Cajun side of the family in which I am very proud but know shamefully too little about. This lit my soul on fire to discover such a gem of my heritage. I'm very grateful to technology and it's ability to share this type of information.
What a blessing.

>;A Series of Interviews: #1 Acadian Joie de Vivre.

Tuesday, July 10, 2012

Organized Purses - yeah right!

Since I'm such a scatterbrain it's very hard for me to be organized or think organized but I have come a long way thanks to my very organized man and extreme effort on my part. My phone rang a moment ago and I grabbed it out of my purse with such accuracy it astounded me. I flashed back to almost wrecking a million times trying to find my phone in some hidden receipt filled corned of my old super large purses and I though hey I should share this awesomeness I have discovered. I have a very utility based purse now. Every thing has a spot it's small and it slings over the side of my hip perfectly. Best part is when I need to feel fashionable I throw it inside one of my big old purses and I'm immediately glamorous again. Thre Is a picture below. I have two phones. One work and one personal and they fit perfect in the long skinny zipper. So do water bottles. I got it from amazon the tag on the inside says "Magellan's"
I actually started carrying it on a bet. My Physicist said to me. "I'll give you 20.00 if you carry a functional purse for a month and I bet you never go back to that big saddle bag of yours" (my purse was not a saddle bag by the way he just thinks he's funny) I took him up on it and never returned to my "saddle bag" - lost the bet but I can pull out my phone and answer it with one hand without even taking my eyes off the road. Just a suggestion for all my big receipt filled purse friends. Also I have a long skinny envelope I keep in my purse to drop all my receipts in. When it's full I drop it in the filing cabinet at home labeled receipts - ta da ...organization for a scatterbrain!

Friday, July 6, 2012

Shut up and be sexy

Women this is for us. Hush your mouth for a moment and realize we have it so good. I live in America and I don't know a woman who isn't strong and independent. Oh, and i know...there are people that will argue that they are naturally quiet or submissive and that's fine but ummmm I don't know you, I don't know a woman like that. What I do know is sometimes we need to shut up. As women, as educated, strong, women we sometimes need to close our mouth and listen. We kill men with the amount of griping we do. Im no male advocate but so many times I have seen it. I was raised with 13 boy cousins and I have learned a thing or two about men. One huge thing I learned? Griping tunes them out. They shut off. Of course it can get under their skin and piss them off and get you what you want at times but it doesn't make you very sexy and it's annoying as hell. It also makes them alienate you. Even if you get what you want out of all this griping it really wins you nothing in the long run. Every woman i know would like to feel sexy. Here is the most important thing: griping isn't sexy. It's not attractive it's not what keeps your men out of other women's beds. Never loose who you are, you strong, beautiful women that I know but please don't take it too far that you forget how to shut up and just be sexy for your men. It's probably more important than any point you are trying to make. Trust me in this one.

Sunday, July 1, 2012

Skulls and butterflies and blue skies.. Maybe

I'm working on this art piece and need a little feedback. My brain is in one of those modes where it wont make a decision on this. I thought I would add color to just the flower and then I thought just the butterfly and now I think maybe leave it alone. Any suggestions? Need to decide what medium also, color pencil, watercolor, pastel? See how my brain becomes a twisted ball of yarn? Ok go!