Im excited about posting this because I cant believe how easy this was, I know crafty people say that crap all the time but really these are my first few attempts at being crafty so Im sure anyone could do it. And for me it was F-R-E-E, FREE because I happened to have everything to make this. The first post relating to this was a burlap picture my cousin wanted that I kinda copied and made for her. It was harder to make and in my opinion didn't turn out as good. This "HOME" sign Im posting about now was the second item she had whispered in my ear about copying. Now mind you I don't feel bad about copying these "ideas" because they were overpriced and mine don't look like "theirs"...that much. Ok so on with it because I LOVE this idea and I see me making a lot more of these in the future. And I hope someone else reads this that's not crafty and does it, because I did it, and I'm not crafty.
FIRST A TIP: (I love giving tips, like, since I did it once I'm an expert) If you don't want to buy wood for projects like these you seldom should EVER have too do so. Almost any construction site in any neighborhood will lend you a piece of left over wood. Most of it is thrown away in a dumpster anyways. (Don't get me started on that but if you wanna learn something awesome look up http://www.phoenixcommotion.com/) You probably pass two or three on your way to work and just never considered stopping and asking for a piece of wood for a craft project your doing. I mean if your half way decent looking and you pull up and tell them you are a local artist or that you live in the neighborhood and you need and scrap piece of wood ummm.... lets just say usually they will be so happy to give you one they might fall off the roof trying to get it to you. So don't pay for wood for this project. Be bold and go ask for it.
OK
WHAT YOU NEED:
WOOD - either a flat piece or do like I did and glue a bunch of little pieces together. I had some nice small oak pieces that were left overs in my burn pile that I fished out. I didn't even clean them off and I kinda liked the pieced together look. But it took longer and requires wood glue so that's up to you but I used what I had. ABOUT THE SIZE: I just eyeballed it. You will be using one piece of standared printer paper per letter for the word so that's a good judge to go by. You can kinda lay four pieces of paper out or if you have an area you know where you want the sign to hang measure it and fit it to that and just move your letters closer or farther apart.
WOOD GLUE
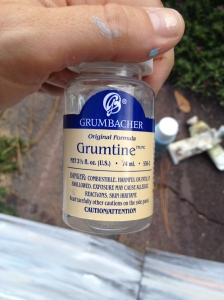
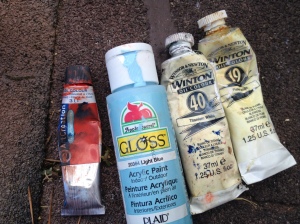
PAINT: I used oil paint mixed with the thinner shown and put in little streaks of blue that were acrylic. I did this because its what I had at my house already. I did read that the letters transfer better on chalky paint but I'm an improviser and made do. I would think if your buying paint for this go with acrylic its easy and dries to a good finish for the letter transfer.
PRINTER
PAPER
SHARPIE MARKER (or anything you want, you'r only using the round end of this to burnish the letters on your board)
PAINT BRUSH or SPONGE
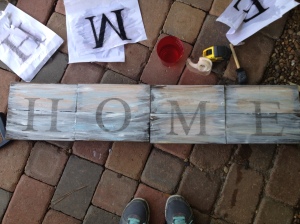
GET YOUR BOARD READY: glue all your little pieces together and let it sit overnight or the hot Texas sun for about four hours. Secure your pieces to another flat board to make sure they all hold together. See picture. This also gives you a good place to hang hooks in the back for mounting.
PAINT: Lightly wash the colors onto the board and blend together. This takes you just playing around a little but its easy and cant be messed up so its the fun part! Be creative, I used white, a little burnt orange and powder blue, but mainly white. Let dry overnight or four hours in the Texas sun :)
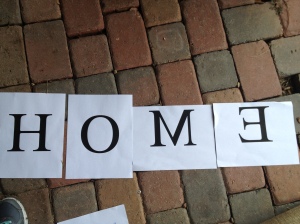
PRINT OUT LETTERS BACKWARDS: or in mirror. This was the toughest part of the whole project, figuring out how to get Word 2007 to do Mirror print. Here is a tutorial I finally had to use. Word 2007 tutorial on Mirror Print
DUH. Print "HOME" I used the font Dutch blown up to 500. printing one word per page. The M and the E will be backwards.
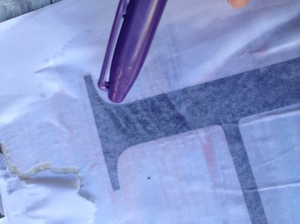
LAYOUT LETTERS AND BURNISH: lay out your letters with the print side facing down (the M and E will be backwards) and use a light piece of tape to keep them in place. You may need to remove this tape so don't stick it down to hard. You also may want to measure out your letters so they are all the same distance from the bottom of the wood. Take a sponge or brush and go over the first letter with water lightly. This is a careful balance: not too much water and not too little. Now take the end of your sharpie WITH THE LID ON, use the round part and start rubbing (burnishing) the ink on the letter "H" Its kinda like your just lightly scribbling over the back. Not too hard or your will go through the paper not too soft or you wont transfer the ink enough. Its easy to tell the pressure you need. Don't be tempted to peek before done or your might get a crooked letter. Do the whole letter till it looks like the paper is almost rubbed through then slowly pull it up and off. Move to the "O" and repeat.
That's it! Easy as pie and amazingly pretty. If your letters seem too light go over them after they have dried with a thin coat of watered down black paint. Or if your like me, I was too much of a weenie to do that, and was scared to mess it up and used a regular old pencil and a little charcoal pencil around the edges.
Hang and admire!





No comments:
Post a Comment